
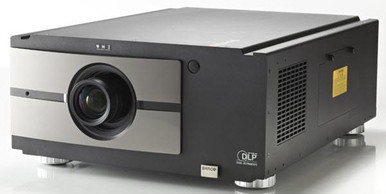
Planning a fixed projector deployment gets risky when screen geometry, signal transport, control, and electrical work remain open until installation day. This AV RLM-W6 Setup Guide and Buying Considerations article focuses on the Barco RLM-W6 WUXGA Three-Chip DLP Projector and the decisions that should be closed before it is ordered or mounted. The supplied facts identify Full HD resolution, while the product name includes WUXGA. That conflict needs confirmation rather than guesswork. Brightness, throw type, lens data, inputs, control options, dimensions, and power requirements also need verification.
This guide gives AV buyers and installers a practical path: define deployment fit, confirm missing projector details, map placement and signal flow, review power with qualified specialists, and commission against written acceptance criteria. It also explains where the supplied RLM-30TL-HWIGA and RLM-15-1CA controlled-power accessories enter the conversation. Their compatibility with the RLM-W6 is not established by the provided data, so they are review items rather than automatic additions. Use each linked product page for live commerce details.
Products at a Glance
- Option 1: Barco RLM-W6 WUXGA Three-Chip DLP Projector
- For projects whose qualified electrical and rack spec…: 30A ISOLATED GROUND CONTROLLED RACEWAY MODULE
- For installations where a qualified designer has conf…: 15A CONTROLLED MODULE,CORD
Quick Comparison Table
| Feature | Barco RLM-W6 WUXGA Three-Chip DLP Projector | 30A ISOLATED GROUND CONTROLLED RACEWAY MODULE | 15A CONTROLLED MODULE,CORD |
|---|---|---|---|
| Resolution | Full HD | ||
| Best For | Churches, schools, and conference room teams evaluating a fixed projector installation after verifying brightness, lens and throw data, inputs, control, mounting, and power requirements. | Projects whose qualified electrical and rack specialists confirm that SKU RLM-30TL-HWIGA meets the approved power and raceway design. | Installations where a qualified designer has confirmed that SKU RLM-15-1CA matches the electrical plan, connected equipment, and required control workflow. |
| Recommended Buyer | Churches, schools, and conference room teams evaluating a fixed projector installation after verifying brightness, lens and throw data, inputs, control, mounting, and power requirements. | Projects whose qualified electrical and rack specialists confirm that SKU RLM-30TL-HWIGA meets the approved power and raceway design. | Installations where a qualified designer has confirmed that SKU RLM-15-1CA matches the electrical plan, connected equipment, and required control workflow. |
Product Images
Projector Options from AudioVideoNation
1. Barco RLM-W6 WUXGA Three-Chip DLP Projector
Who should compare it: Churches, schools, and conference room teams evaluating a fixed projector installation after verifying brightness, lens and throw data, inputs, control, mounting, and power requirements.
Why it belongs here: It is the exact RLM-W6 projector addressed by this guide. Its product page gives buyers a direct place to confirm the resolution wording and close the remaining installation questions.
SKU: RLM-W6
Key Features
- Full HD resolution identified in the available product facts
- Exact model and procurement reference: SKU RLM-W6
- Listed in the Projectors category
- Dedicated product page for current commerce details
Things to Consider
The product name includes WUXGA while the available facts identify Full HD resolution. Confirm native resolution before specification. Brightness, throw, lens, connectivity, control, dimensions, weight, mounting limits, and power requirements also need verification.
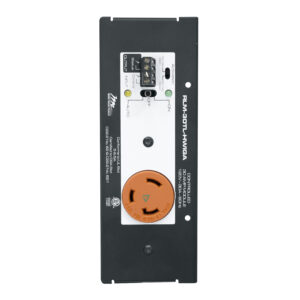
2. 30A ISOLATED GROUND CONTROLLED RACEWAY MODULE
Who should compare it: Projects whose qualified electrical and rack specialists confirm that SKU RLM-30TL-HWIGA meets the approved power and raceway design.
Why it belongs here: It gives installation teams a specific controlled-power accessory to assess during rack and electrical design. Inclusion is for evaluation because the provided data does not establish compatibility with the RLM-W6.
SKU: RLM-30TL-HWIGA
Key Features
- Listed in the Accessories category
- Controlled raceway module product type identified by its supplied name
- Exact procurement reference: SKU RLM-30TL-HWIGA
- Dedicated product page for current commerce details
Things to Consider
Beyond the product name, no technical or compatibility details were supplied. Verify voltage, connectors, capacity, grounding, certifications, physical fit, control behavior, and code compliance before adding it to a design.
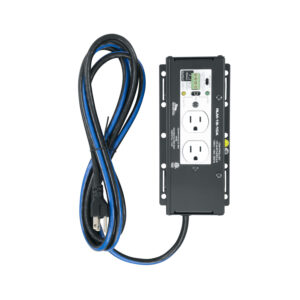
3. 15A CONTROLLED MODULE,CORD
Who should compare it: Installations where a qualified designer has confirmed that SKU RLM-15-1CA matches the electrical plan, connected equipment, and required control workflow.
Why it belongs here: It gives teams another supplied controlled-power accessory to review when planning rack or equipment power. The provided data does not establish that it works with the RLM-W6.
SKU: RLM-15-1CA
Key Features
- Listed in the Accessories category
- Controlled cord module product type identified by its supplied name
- Exact procurement reference: SKU RLM-15-1CA
- Dedicated product page for current commerce details
Things to Consider
Beyond the product name, no connection, electrical, physical, certification, or compatibility details were supplied. Confirm every requirement with current documentation and a qualified electrical professional.
Barco RLM-W6 WUXGA Three-Chip DLP Projector vs 30A ISOLATED GROUND CONTROLLED RACEWAY MODULE: Main Differences
- Choose Barco RLM-W6 WUXGA Three-Chip DLP Projector if Churches, schools, and conference room teams evaluating a fixed projector installation after verifying brightness, lens and throw data, inputs, control, mounting, and power requirements..
- Choose 30A ISOLATED GROUND CONTROLLED RACEWAY MODULE if Projects whose qualified electrical and rack specialists confirm that SKU RLM-30TL-HWIGA meets the approved power and raceway design..
- Choose 15A CONTROLLED MODULE,CORD if Installations where a qualified designer has confirmed that SKU RLM-15-1CA matches the electrical plan, connected equipment, and required control workflow..
Start with RLM-W6 deployment fit
Begin with a one-page design brief. State the planned screen size and aspect ratio, closest and farthest viewer, content types, room-lighting states, source devices, control method, operating schedule, and support owner. These inputs turn “does it fit?” into a set of checks that an integrator or facilities team can answer.
For the RLM-W6, the available facts identify Full HD resolution. The product name, however, contains WUXGA. Treat native resolution as unresolved until the product page or current manufacturer documentation confirms it. Brightness, throw type, lens options, and physical details also need confirmation. Those items determine whether it can fill the intended screen from the available mounting zone and meet the room’s visual requirements.
Write acceptance criteria before requesting a quote. Include required image size, usable lighting conditions, source formats, desired control actions, installation constraints, and service access. Churches should document every lighting scene used during services. Schools should cover teacher, guest, and managed-device workflows. Conference room teams should list resident room systems and visitor laptops. If a required detail cannot be verified, keep the purchase decision open. Matching the SKU alone does not prove deployment fit.
Barco RLM-W6 setup: placement and screen planning
Measure first. Record the screen’s visible width and height, the range of possible lens-to-screen distances, ceiling height, mount location, audience sightlines, nearby lights, structural obstacles, and access above the ceiling. A scaled plan helps expose conflicts before mounting hardware or cabling is ordered.
Next, obtain verified throw and lens information for the exact RLM-W6 configuration. Do not calculate placement from the product name or resolution wording. Confirm which lens is included, if any, and whether its documented throw range covers the planned image size from the available position. Check available zoom, lens adjustment, orientation limits, and image-correction controls in current documentation. None of those capabilities are established in the supplied facts.
Freeze the mounting coordinates only after the exact projector dimensions, weight, ventilation clearances, and service-access needs are known. Have the building team approve the supporting structure and mounting method. Keep sprinkler heads, lighting fixtures, HVAC outlets, and ceiling access panels on the drawing.
Plan a physical alignment check before final cable dressing. The image should land on the screen from the verified mounting position without assuming an undocumented adjustment range. This step protects the schedule if the selected lens, mount, or screen position needs to change.
Projector deployment planning for signals and control
Draw the complete signal path from every source to the RLM-W6. Include presentation computers, media players, room systems, switchers, extenders, wall plates, adapters, and any recording or streaming branch. Add cable lengths and connector transitions. Then confirm that the projector’s documented inputs and accepted signal formats support the design.
Protected media, managed computers, and conferencing systems can add format or handshake requirements. Get written compatibility confirmation for the complete path if those sources matter to the room. The provided product data does not establish input types, copy-protection support, refresh rates, or accepted resolutions.
Resolve the Full HD and WUXGA wording before setting source output formats or preparing graphics. Confirm native resolution and supported input timing from a current authoritative document, then configure and test each source against that information.
Control needs the same discipline. List required actions such as power, source selection, status reporting, and scheduled operation. Verify the available control connections and commands before programming begins. If audio must travel through the projection chain, define that route separately and confirm every required connection. No audio capability should be assumed from the supplied data.
Projector power planning and the supplied accessories
Power design begins with the RLM-W6 electrical requirements, the room’s circuit plan, and the manufacturer’s required startup and shutdown procedure. Obtain the exact voltage, power draw, connector, and operating guidance before selecting a circuit or controlled outlet. A qualified electrical professional should review grounding, circuit capacity, local code, rack power, and any proposed switching or sequencing.
Do not infer compatibility from the shared “RLM” letters in the product SKUs. The RLM-30TL-HWIGA product is named 30A ISOLATED GROUND CONTROLLED RACEWAY MODULE. The RLM-15-1CA product is named 15A CONTROLLED MODULE,CORD. They are listed as accessories, but the supplied data does not connect either one to the Barco projector.
Place each accessory on the electrical review list only if the project needs that product type. The designer should verify voltage, capacity, plug and receptacle details, grounding arrangement, physical fit, certifications, control behavior, and code compliance from current product documentation. They should also confirm that controlled switching follows the projector’s required shutdown process.
Treat these accessories as separate procurement decisions. Include one only after the electrical designer, rack specialist, and current documentation establish its suitability for the planned system.
Projector buying guide checklist for installation
Use staged signoffs so unresolved details do not travel into the field:
1. Design review: Confirm the exact RLM-W6 SKU, native resolution, brightness, lens and throw data, mounting limits, input requirements, control method, electrical needs, and service clearances.
2. Procurement review: Match every quote and order to the approved model, lens, mount, signal equipment, and power design. Verify what is included with each product rather than assuming accessories ship together.
3. Rough-in review: Check the structural mounting point, power location, conduit, cable routes, wall plates, rack space, labeling plan, and service access against the approved drawing.
4. Installation review: Inspect mount security and physical alignment. Apply only the clearances, orientation limits, and adjustment methods confirmed for the exact configuration.
5. Commissioning review: Test every source, operating mode, control command, shutdown workflow, and planned lighting state. Record the final settings, cable routes, equipment identifiers, and support contacts.
Build the final acceptance test around the design brief. A church may need checks under several sanctuary lighting scenes. A school may need both managed and guest devices. A conference room may need resident conferencing equipment plus common visitor connections. Document failures and corrections before the room is handed over. This creates a clear boundary between verified operation and features that were never part of the approved scope.
Price-to-performance, stock and availability checks
Judge price-to-performance against the written room requirements. Start with pass-or-fail items: verified image output for the intended screen and lighting, a workable lens and throw configuration, required signal and control support, safe mounting, and an approved electrical plan. A product that misses one of those gates can create redesign work even if its purchase terms look attractive.
Review the complete installed system. Account for any required lens, mount, signal transport, control hardware, electrical work, rack accessories, commissioning labor, and service plan when comparing proposals. Confirm every item from current documentation and the seller’s quote. The provided data does not establish what ships with the RLM-W6 or either power accessory.
Use the linked AudioVideoNation product pages for live commerce details, including current price, stock and availability. Before fixing the installation date, confirm the exact SKU, fulfillment timing, included components, and any project-specific procurement terms with the seller. Keep substitutions under formal review. A replacement projector can change throw calculations, mounting, signal support, control programming, and power requirements.
Installed AV projector fit by room type
Church teams should test the design against the sanctuary’s real lighting scenes, screen location, seating depth, worship-content workflow, and operator skill level. If cameras or streaming systems share sources, add those signal paths to the drawing. Select the RLM-W6 only after its verified brightness, lens, resolution, and connections meet those requirements.
School teams should document who connects devices, which source formats are approved, how the room is controlled, and how support staff reach the projector. Check sightlines around lights, signs, ceiling fixtures, and teaching equipment. Confirm service access without disrupting the room’s fixed infrastructure.
Conference room teams should map the resident conferencing system, room computer, presentation switcher, and visitor connections. Define the expected startup sequence and source-selection behavior before control programming. Test each approved workflow during commissioning.
The decision standard stays the same across all three environments. Verify the RLM-W6 configuration against the room, then verify every accessory against the completed design. Unconfirmed specifications belong on the open-issues list, not in the installation schedule.
Related AudioVideoNation Links
- Browse Projector at AudioVideoNation
- Barco RLM-W6 WUXGA Three-Chip DLP Projector
- 30A ISOLATED GROUND CONTROLLED RACEWAY MODULE
- 15A CONTROLLED MODULE,CORD
Product Information Sources
- Barco RLM-W6 WUXGA Three-Chip DLP Projector product information
- 30A ISOLATED GROUND CONTROLLED RACEWAY MODULE product information
- 15A CONTROLLED MODULE,CORD product information
FAQ
What should I verify before buying the Barco RLM-W6?
Before buying the Barco RLM-W6, verify its native resolution, brightness, lens and throw data, inputs, control options, dimensions, weight, mounting limits, power requirements, and included components. These details are required to confirm screen coverage, infrastructure fit, and system compatibility, but they are not established by the supplied facts.
Is the RLM-W6 confirmed as Full HD or WUXGA?
The supplied data does not establish one confirmed native resolution, so verify it before specifying the RLM-W6. The available facts identify Full HD, while the exact product name contains WUXGA.
How should installers plan RLM-W6 placement without throw data?
Installers should not finalize the mount or screen position until verified lens and throw information is available for the exact RLM-W6 configuration. Measure the screen and available mounting zone first, then use current authoritative documentation to confirm image size and distance.
Are RLM-30TL-HWIGA and RLM-15-1CA confirmed compatible with the Barco RLM-W6?
No compatibility between the two power accessories and the Barco RLM-W6 is established by the supplied product data. Have qualified electrical and AV professionals verify the projector requirements, accessory details, shutdown workflow, and local code before pairing them.
How should buyers evaluate RLM-W6 price-to-performance?
Buyers should evaluate RLM-W6 price-to-performance by comparing the current project quote with verified room requirements and the complete installed-system scope. Include any required lens, mount, signal transport, control, electrical work, accessories, and commissioning when reviewing proposals.
Where can buyers check current stock and availability?
Buyers should check the linked AudioVideoNation product pages for current stock and availability because this guide makes no live inventory claim. Confirm the exact SKU, fulfillment timing, and included items with the seller before scheduling installation.
Conclusion
Use this AV RLM-W6 Setup Guide and Buying Considerations comparison to match documented specifications to the room and installation requirements. Review the linked product pages for current purchase details before ordering.
Products Used
| SKU | Product Name | URL |
|---|---|---|
| RLM-W6 | Barco RLM-W6 WUXGA Three-Chip DLP Projector | View product |
| RLM-30TL-HWIGA | 30A ISOLATED GROUND CONTROLLED RACEWAY MODULE | View product |
| RLM-15-1CA | 15A CONTROLLED MODULE,CORD | View product |